Browsing WatchDog - My first browser extension

A software engineer with more than a decade of experience in building scalable back-end systems for multiple 'SaaS' products.
Always on the lookout to learn new things.
The need for an extension
Of late, I found myself spending most of my free time on YouTube. It all started with me watching the coverage of the Chess Olympiad (Which was held in Chennai, my hometown) on YouTube. As YouTube, seems to be the only place where one can watch chess, I continued to follow chess events on YouTube. But soon found myself spending more and more time, watching videos on a variety of topics. I was looking for a way to curb myself from spending time on YouTube.
Around this time, I happened to read the book ‘Atomic Habits’ by James Clear. The book underlines the importance of small daily habits in our life and how they contribute to a person’s destiny.
One of the tips given in the book for building a good habit is to make the good habit easy and obvious to do. Conversely, if you want to get rid of a bad habit, make the bad habit difficult to do. For example, if you are looking to spend less time on Television, try keeping the remote in a separate and not easily accessible place. So, if you want to watch TV, you have to make an extra effort to fetch the remote first. This extra effort would act as a deterrent.
I wanted to apply the same technique to correct my browsing habit. I thought of building an extension, which would prevent me from accessing YouTube.
After pondering for a while, I came up with the following requirements.
The extension should allow the users to configure a list of websites on which they want to spend less time on.
When a user visits any of the websites in the configured list, they should be shown a prompt nudging them to spend their time on more useful things.
The extension should allow the user to configure a list of tasks, which they should be doing, instead of spending their time browsing. This list should be included in the prompt shown to the user.
The extension should allow the user to configure a dedicated period, during which they can browse the configured websites without interference.
Now that I have provided the context, let us go through the details of building and publishing a browser extension.
Building blocks of an extension
Browser extensions could be considered similar to apps running on our mobile phones. Similar to apps, extensions run in the context of the browser and provide a way for any developer to implement additional features related to browsing.
One nice thing to highlight is that the browser extensions are compatible (except for a few minor differences) across the two major browsers Chrome and Firefox. So the same extension would work in both Chrome and Firefox.
Any browser extension consists of the following building blocks.
Web Extension API
This is a bunch of JavaScript APIs provided by the browser to the extension developers. Typically each API, in addition to providing some functionality, also exposes events to which the extension can register. The extension will be notified when the events happen, allowing it to execute the required business logic in response to the events fired.
For example, the bookmarks API provides read/write access to the bookmarks data in the browser. It also allows the extension to register for events like bookmark creation, deletion etc.
Manifest File
A JSON file that describes the extension. It contains information such as the extension name, logo, the APIs to which the extension has requested access etc.
The manifest file consists of many fields but the only required fields are
name - Specifies the name of the extension.
version - The extension version.
manifest_version - The version of the manifest file. The latest version supported by Firefox is '2' whereas the latest version supported in Chrome is '3'
Content Script
A content script is a piece of JavaScript code that an extension can inject into a web page. Once added to the web page, the JavaScript code has full access to the page's DOM. It is like any other JavaScript code that comes with the web page itself.
There are two ways to inject the content script into a web page. The first way is using manifest files. We will see this in action shortly. The second way is to inject programmatically via the tabs API.
A limitation of the content script is that, it cannot use all the web extension APIs. It can use only use a subset of the APIs. But this limitation can be easily overcome by using background scripts, which is …
Background Script
While a content script is associated with the web page into which it is injected, a background script is associated with the browser extension. An extension specifies its background script in the manifest file using the ‘background’ key. The specified background script is loaded and executed, when the extension is loaded by the browser on startup.
Background scripts can use any of the web extension APIs as long as it has requested the corresponding permission in the manifest file. Also, background scripts and content scripts can communicate with each other by using the runtime API. If the content script needs to execute any API which it is not allowed to do, it can send a message to the background script. The background script on receiving the message, can execute the API and send the response back to the content script.
Options Page
An extension might need some input from the user. For example, when I listed the requirements for my extension, I mentioned it should allow the users to configure a list of websites. This is achieved using the options page.
The options page is an HTML page, used to get the required inputs from the user. It is specified using the ‘options_ui’ key in the manifest. The HTML page in turn can include JavaScript code. The JavaScript code can also use any of the web extension APIs that the extension has requested access for.
MVP 1 Modifying the content
In the first step, let us look to create a simple extension that modifies the content of YouTube. The entire source code for both Chrome and Firefox is available here.
As mentioned above, we can use the content script to modify the content of any website. To use content scripts, in the manifest file, we would need to specify the file containing the content script, and the list of sites into which the content script must be injected.
Take a look at the below Manifest file.
This is for a Firefox extension. In lines 2–5, we have the manifest_version, name and version fields which are mandatory.
In line 6, we have the description field and in lines 7–9, we are specifying an icon for our extension. The ‘about:addons’ page in Firefox allows you to install new extensions and also lists all the extensions installed already. The information from the description and icons field will be used there to display our extension.
In lines 10–15, we have the 'content_scripts' array field. Each item in the array is an object that consists of the mandatory 'matches' field and optional 'js' and 'css' fields
The 'js' field contains the name of the file containing the content script that we want to inject into a web page. The 'matches' field allows us to specify the web pages into which we want to inject the content script. In this example, we have used wildcard patterns to ensure our content script is injected into any web page belonging to YouTube. See here for more details on supported patterns.
The 'css' field allows us to inject additional CSS styling into a web page.
Now let us look into the contents of our content script file.
As you can see, it is very simple. We have a function 'modifyContent', which uses the 'document.body' element APIs to update the content of the web page. In line 24 we are invoking this function. So, whenever this JavaScript code is loaded into a web page, the 'modifyContent' function will be executed which will replace the contents of the web page.
At this point, if you install the MVP1 version of the extension and visit any page on YouTube, you should see the following.

The styling for the content comes from the CSS file which we specified in the manifest file.
MVP 2 Making the extension configurable
In MVP 1, we saw how to modify the content of a web page. One limitation of this version is that it will work only for YouTube. To make the extension generic, we need a way to get the list of websites as input from the user and inject our content scripts into web pages belonging to the configured websites.
To get the list of websites as input from the user, we can use the options page feature. We can design an HTML page where the user can configure the website names. This configuration can then be stored in the user system using the storage sync APIs.
Take a look at the below manifest file.
It is similar to the manifest file of MVP1, except for the additional lines from 16–27
In lines 16–17, we are requesting permissions to use the storage API. For using the storage APIs, we also need to specify an id for the extension. This is done in lines 23–26. All the key/value pairs stored by the extension will be put under this extension id. This allows two different extensions to store data using the same key without overwriting each other's data.
In lines 19–21, we are specifying an HTML page 'options.html' as the extension options page. The HTML page is displayed when the user visits the extensions preferences section.
See below the contents of 'options.html' and a screenshot of the preferences sections.
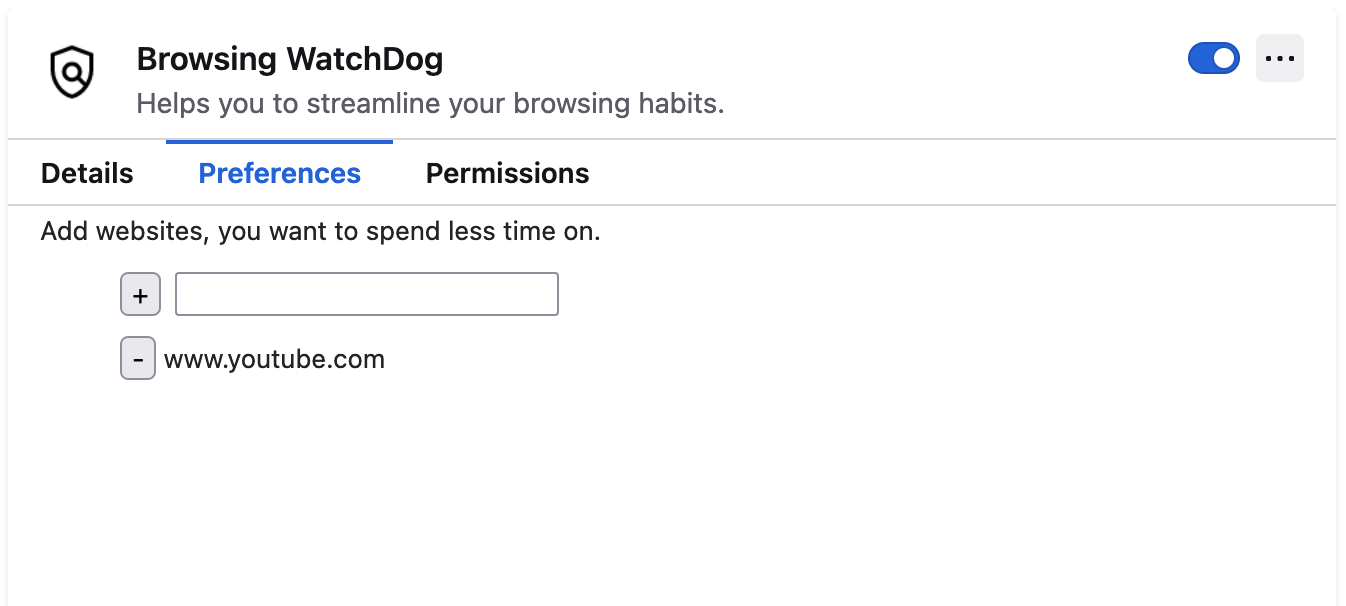
As you can see from the screenshot the HTML page is displaying a text box with a '+' button next to it. Users can enter a website in the text box and click '+' to add it to their list of websites. We also have an unordered list, which displays all the configured websites with a '-' button next to it. Clicking on '-' will remove the corresponding website from the list.
In line 23 of 'options.html', we are including a JavaScript file ‘options.js’. This JavaScript file contains the code for reading/writing the website list from/to system storage.
The entire code from options.js is listed below.
There are three functions,
- restoreFilteredUrls
In line 75, we configure this function to be called whenever the preferences page is loaded.
The function reads the configured website list from storage. For each website, adds a '<li>' element. For each '<li>' element, it also configures a 'click' event listener on the '-' button, which calls the 'removeUrl' function.
- saveUrl
This is called whenever the '+' button next to the textbox is clicked. This reads the current list from storage, adds the newly entered website to the list and saves the updated list.
- removeUrl
This is called whenever the '-' button is clicked. This removes the website listed next to the '-' button and saves the updated list.
These functions use the 'browser.storage.sync.get' and the 'browser.storage.sync.set' APIs to read/write the config from/to storage. The configured websites are stored under the key 'filtered_urls' which we have defined in line 1.
We have now solved the problem of allowing the user to configure their website list. Now, we have to find a way to inject the content script only into any web page from these websites. But the 'content_script.matches' field in the manifest file, expects a hard-coded list of URL patterns. Let us approach this problem differently.
I had mentioned earlier that the content scripts can also call a subset of the Web Extension API. Fortunately, storage APIs are one of them. We can inject the content script into all the websites and update the content script to modify the website content only if the website is in the user-configured list.
If you look at the 'content_script.matches' field in the manifest file of MVP1 and MVP2, you would notice it has changed to '<all_urls>' from '*://*.youtube.com/*' . This is a special pattern, that causes the content script to be injected into any web page.
Now we have to just update the content script from MVP1 to make sure it modifies the website content only if the website is in the user-configured list.
The updated content script is given below.
Now instead of always calling the 'modifyContent' function we first get the list of websites configured by the user using the 'brower.storage.sync.get' API. We check if the current website is present in the configured list. If present, we call the 'modifyContent' function.
MVP 3 Injecting content scripts programmatically
Now let us look at how content scripts can be injected into websites programmatically via background scripts. For this, our background script needs two things
A way to inject JavaScript and CSS content into a web page.
A way to identify whenever a user navigates to a new web page so that it can inject the JavaScript into that web page.
For the first requirement, we can use the 'tabs.executeScript' and 'tabs.insertCSS' APIs, which provide a way to inject any JavaScript and CSS content into the HTML content of a specific browser tab.
For the second, we can make our background script listen to the events which are fired by the browser whenever a new page is loaded in any of the browser tabs. The fired event would have the details of the browser tab and the URL of the web page. So whenever a web navigation event is fired, the background script can check if the URL in the event belongs to any of the websites from the configured list. It can then use 'tabs.executeScript' and 'tabs.insertCSS' APIs to inject the required content to modify the content of the web page.
First, let us take a look at the changes required in the manifest file for this approach. What differences do you observe in the manifest file below from the manifest file of MVP2?
The 'content_scripts' section is completely missing and we have a new section called 'background' in lines 28–29 where we are specifying a background script to be loaded. Also in the 'permissions' section, we have a few additional entries. The additional permissions are,
webNavigation
This is required because we want our background script to listen for events that are fired whenever the user navigates to a new website.
tabs
This allows our background script access to the 'tabs' APIs.
<all_urls>
This provides the extension with the required permission to inject JavaScript and CSS content into any web page.
Now let us quickly go through the implementation of background.js
The background script will be executed, when the extension is installed for the first time or when the browser is opened after installing the extension.
In line 52, we are fetching all the websites configured by the user from storage and calling the 'addListener' function.
Inside the 'addListener' function on lines 36-44, we are listening for web navigation events using the 'onCompleted' and 'onHistoryStatusUpdated' APIs. These APIs expect a filter argument which is a list of website hostnames and a callback function that needs to be called whenever a web navigation event is received. The filter argument allows us to subscribe to web navigation events of only certain websites we are interested in.
We construct the filter argument using the list of configured websites which is passed to the 'addListener' function. We are using the 'getCurrentTabAndAddContentScript' function defined in line 4 as the callback function.
The 'getCurrentTabAndAddContentScript' is where we are injecting the JavaScript and CSS into the navigated web page. This function is passed a details object which provides the URL for which the event is fired and the browser tab for which the event was fired. In line 9, we check if the hostname from this URL is in the configured list of websites. If found, we inject the required JavaScript and CSS which modifies the content of the website.
In line 71, we are configuring the logStorage function as a listener for the storage update events. Whenever any new key is added or the value of an existing key is updated in the storage, the 'logStorage' function will be called.
Inside the 'logStorage' function, we check if the key which is added/updated is 'filtered_urls'. If yes, we again call the addListener function. This is to ensure that we subscribe to web navigation events for any new websites that are added by the user via the preferences section.
With this, we have handled almost all of the requirements we listed down. I did not cover the requirements around configuring a list of tasks and a dedicated period for browsing without monitoring. Handling those is very similar to how we made the list of websites to monitor configurable. If interested, you could check out the implementation of these for both Firefox and Chrome in this repo.
For Firefox, you can also install the final version of the extension that I published from here.
Gotchas
When injecting CSS, ensure the styling applies to only the HTML content that you inject. For example in MPV1, if you notice, the value of the 'id' attribute of every element that is added by the content script begins with a 'watchdog_' prefix. The injected CSS also applies style based on the 'id' attribute only. This ensures that even though we inject the CSS in every website by default, it will apply styling only to the HTML content injected by the content script. The only caveat to this is if the actual content of any webpage also has HTML elements with the ‘id’ attribute starting with 'watchdog_'
While designing the HTML for the preferences page, make sure you have no JavaScript inside the HTML. Not even an 'onClick' attribute to an HTML button is allowed. All these event listeners should be configured in a JavaScript file and this should be included via the <script> tag.
There are subtle differences between Chrome and Firefox. In Chrome the APIs are named 'chrome.*'. In Firebox the APIs are named 'browser.*'. Also, Chrome supports Manifest V3, while Firefox supports only Manifest V2. There are differences between Manifest V3 and Manifest V2 which would be important to know if you are developing extensions for both browsers. Check this page for further details.
Thanks a ton for reading this article. Hope you enjoyed this and learned something new. Please follow me for more such articles.


